The following is a list of tasks we suggest you complete at the end of each month. Depending on the nature of your business, some of these tasks may not apply to you.
Task 1: Run the Company Data Auditor
The Company Data Auditor is a series of windows that guides you through the process of checking and ensuring the accuracy of the records in your MYOB company file. You can use the auditor to:
- display basic information about the company file, such as the file name, release number, location, size, locked periods, etc.
- perform maintenance tasks, such as set lock periods
- display bank and credit card account details, including the current balance and the date when they were last reconciled
- reconcile your bank and credit card accounts
- check your transactions for exceptions and audit trail changes.
To run the company data auditor
- Go to the Accounts command centre and click Company Data Auditor. The Company File Overview window appears.
- the company file name
- the MYOB software release number
- the location of the company file
- the size of the company file
- the date on which the company file was last verified
- the end month and year of the current fiscal year
- the locked period, if one has been specified.
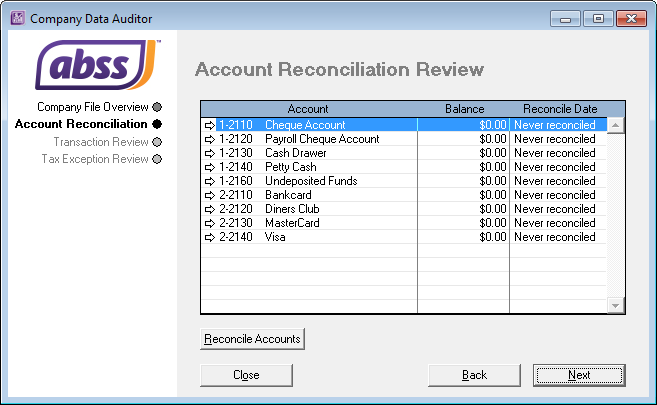
- When you have completed the required maintenance tasks, click Next. The Account Reconciliation Review window appears.
- your bank and credit card accounts
- the balance of each account
- the date on which each account was last reconciled.
- If you want to reconcile an account, select the account and click Reconcile Accounts. For more information, see 'Reconcile your bank accounts' on page 44.
- Click Next. The Transaction Review window appears
- Enter the start date and end date of the period you want to review.
- Click Run Review. The following tasks are undertaken
- When you have finished viewing and, if necessary, printing the Transaction Review reports, click Next. The Tax Exception Review window appears.
- Click Run Review. The following tasks are undertaken.
- entries that seem unusually high or low for the account that has been affected
- debit amounts for accounts that normally have credit entries and vice versa
- unusually high or low ending balances an unusually high or low number of entries for a specific account.
- Click Finish. A message appears asking if you would like to print a report summarising the audit findings. Click Yes to print the report or click No to close the Company Data Auditor window without printing the report.
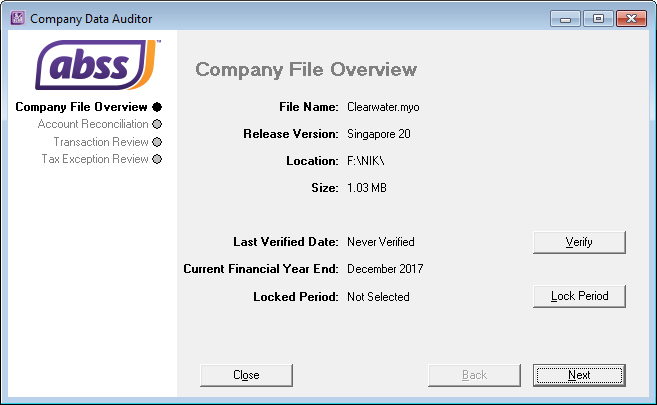
This window shows you:
If necessary, you can perform the following maintenance tasks from this window:
| If you want to | Do this |
| Check your company file for errors | Click Verify and complete the verification procedure. |
| Set the locked periods for your company file | Click Lock Periods and select the month before which data cannot be entered. |
This window shows you:
| Reconcile invoices with the linked receivables account | The total of all customer balances is compared to the current balance of the linked accounts receivable account. If there is an out-of-balance amount, click Display to view the Receivables Reconciliation Exceptions report and review, customise or print the details of the report. |
| Reconcile purchases with the linked payables account | The total of all supplier balances is compared to the current balance of the linked accounts payable account. If there is an out-of-balance amount, click Display to view the Payables Reconciliation Exceptions report and review, customise or print the details of the report. |
| Compare item values with the linked inventory account | The total value of inventory on-hand is compared to the current balance of the linked inventory account. If there is an out-of-balance amount, click Display to view the Inventory Value Exceptions report and review, customise or print the details of the report. |
| Scan for future-dated transactions | The company file is checked for any transactions dated after the date of the current session (that is, the current date). If there are transactions dated after the current session, click Display to view the Future Dated Transactions report and review, customise or print the details of the report. |
| Scan for prepaid transactions | The company file is checked for any prepaid transactions. These transactions include all customer and supplier payments (excluding deposit payments) that have a payment date prior to the date of the invoice or purchase. If there are payments made prior to the invoice or purchase date, click Display to view the Prepayment Transactions report and review, customise or print the details of the report. |
| Scan for deposits paid | The company file is checked for any deposits paid (within the date range specified) on sales orders or purchase orders. If any orders have a payment flagged as a deposit transaction, click Display to view the Deposit Transactions report and review, customise or print the details of the report. |
| Review audit trail changes | If you have selected the Use Audit Trail Tracking [System-wide] option in the Preferences window (Security tab), the company file is checked for any transactional, accounts, and system changes. If any changes occurred within the date range specified, click Display to view the Audit Trail report and review, customise or print the details of the report. For more information on audit trail tracking, see 'Audit trail tracking system'. |
| Check for job exceptions [Cash Transactions] | If you have selected the Warn if Jobs Are Not Assigned to All Transactions [System-wide] option in the Preferences window (System tab), the company file is checked for cash transactions (within the date range specified) that have no job number. If any transactions are detected with no job number, click Display to view the Job Exceptions [Cash Transactions] report and review, customise or print thedetails of the report. |
| Check for job exceptions [Invoice Transactions] | If you have selected the Warn if Jobs Are Not Assigned to All Transactions [System-wide] option in the Preferences window (System tab), the company file is checked for sales and purchase transactions (within the date range specified) that have no job number. If any transactions are detected with no job number, click Display to view the Job Exceptions [Invoice Transactions] report and review, customise or print the details of the report. |

| Check for tax code amount variances [Sales] | The company file is checked for variances between the tax code amount posted and the tax code amount calculated for the tax codes assigned to sales transactions. If a variance is found, click Display to view the Tax Code Amount Variance report and review, customise or print the details of the report. |
| Check for tax code amount variances [Purchases] | The company file is checked for variances between the tax code amount posted and the tax code amount calculated for the tax codes assigned to purchase transactions. If a variance is found, click Display to view the Tax Code Amount Variance report and review, customise or print the details of the report. |
| Check for tax code exceptions (invoice transactions). | The company file is checked for sale and purchase transactions without a tax code assigned or where the entered tax code is different to the default tax code. If any invoice transactions are detected with no tax code or the wrong code, click Display to view the Tax Exemptions [Invoice Transactions] report and review, customise or print details of the report. |
| Check for tax code exceptions (cash transactions). | The company file is checked for Spend Money and Receive Money transactions without a tax code assigned or where the entered tax code is different to the default tax code. If any cash transactions are detected with no tax code or the wrong code, click Display to view the Tax Exemptions [Cash Transactions] report and review, customise or print details of the report. |
| Audit Trail | Reviews changes made to recorded transactions, account details and system settings. Note that before you can track and report changes, you need to activate the audit trail tracking preference. For more information, see 'Audit trail tracking system'. |
| Profit & Loss Statement | Shows your profit and loss figures. |
| Balance Sheet | Reviews your financial position as of the end of a period. |
| Summary Trial Balance | Identifies amounts incorrectly entered. When reviewing this report, check for: |
| Balance Sheet [Budget Analysis] | Lists account balances as at the end of a selected period, along with the budgeted amounts for them. If you have determined that changes need to be made to the amounts you have budgeted for the coming months, you can adjust your budget. |
| Profit & Loss [Budget Analysis] | Lists account balances for a selected period, along with the budgeted amounts for them. If you have determined that changes need to be made to the amounts you have budgeted for the coming months, you can adjust your budget. |
Task 2: Reconcile your bank accounts
To ensure the accuracy of your business records, you should keep your record of each bank account balance matched up with your bank?s records.
If you are reconciling your bank account for the first time since you started using your MYOB software, see 'Do an initial bank reconciliation'.
Task 3: Review reports
There are several reports that we recommend you review at the end of each month. You can use these reports to identify and correct any discrepancies in your records, as well as spot any trends in your business. These reports are listed below.
TIP : Create a report batch You may find it useful to create a report batch for your month-end reports and print them all in one go. For more information, see 'Printing report batches'.
| Report | Description |
| Receivables Reconciliation | Lists all your outstanding receivables. |
| Payables Reconciliation | Analyse Sales [Customer] |
| Analyse Purchases [Supplier] | Lists your company's monthly purchases |
| Items List [Summary] | Shows what?s on-hand and what needs to be ordered. |
| Statement of Cash Flow | Shows how your cash position has changed over a period of time, what profit you have earned, where you received additional cash, and where your cash was spent. |
| Cash Flow Worksheet | Enables you to estimate your short-term cash needs. |
Task 4: Send customer statements
Most businesses send statements to customers who have outstanding balances at the end of each month. You can either print out and send these statements through the mail or send them via email.
Statement types You can choose from two types of customer statement; invoice and activity
- Invoice statements list all invoices aged as at a specified date.
- Activity statements list all sales invoices, payments, and orders with a customer deposit within a specified date range. Activity statements include a running account balance.
To print a customer statement
- Go to the Sales command centre and click Print/Email Statements. The Review Statements Before Delivery window appears
- Click the To Be Printed tab.
- In the Statement Type field, select the statement type
- Specify the statement period.
- If you selected Invoice as the statement type, enter an aging date to display invoices outstanding as at that date.
- If you selected Activity as the statement type, enter the statement period in the From and to fields.
- In the Print field, type the number of statements you want to print per customer.
- Click Advanced Filters to filter and customise the information to be displayed in the customer statement. For more information, see 'Advanced filters'.
- Click in the select column
 next to the name of each customer you want to print statements for.
 - Click Print.
To email a customer statement
- Go to the Sales command centre and click Print/Email Statements. The Review Statements Before Delivery window appears.
- Click the To Be Emailed tab.
- In the Statement Type field, select the statement type.
- Specify the statement period.
- If you selected Invoice as the statement type, enter an aging date to display invoices outstanding as at that date.
- If you selected Activity as the statement type, enter the statement period in the From and to fields
- If you want to include invoices up to the specified statement date, select the Only include invoices up to Statement Date option.
- Click in the select column next to the name of each customer you want to email statements to.
- If you want to change a customer?s email address, highlight their name and select an address from the Email Address list
 . Alternatively, type the email address in the Email Address field.
 - Type the subject and message of the email or accept the default subject and message. If you want to change the default message, click Email Defaults and make the changes as appropriate.
- If you want to filter or customise the statement, or to change the type of form it will be printed on, click Advanced Filters. For more information, see 'Advanced filters'.
- Click Send Email.
Task 5: Record depreciation
NOTE : If you depreciate your assets at the end of the financial year, make this step a part of your end-of-year routine. Consult your tax adviser or accountant for information on when to depreciate your assets.
Your company?s vehicles and equipment lose value each year. Part of the cost of vehicles and equipment can be allocated as an expense to your company each year you benefit from their use. The allocation of the cost of a piece of equipment over its useful life is called depreciation.
There are several methods of depreciation. Consult your accountant to see whether you should be depreciating vehicles and equipment and, if you should, which method is best for you.
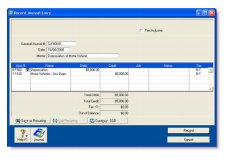
You record your depreciation figures using a journal entry.
To record depreciation expense
- Create a new asset account for each type of asset you depreciate. Add the words ?Accum Dep? (for Accumulated Depreciation) at the end of each new account name. Give the new account a number that allows it to come directly after its corresponding asset account in the accounts list. For more information, see 'To create an account'. In the following example, we have a header account, Vehicles, numbered 1-1600, and a detail account, Vehicles Original Cost, numbered 1-1610. We have created a new asset account called Vehicles Accum Dep, numbered 1-1620.
- Create an expense account for depreciation
- Once you have determined your depreciation amounts, make journal entries to credit the accumulated depreciation asset accounts and debit the depreciation expense account. The accumulated depreciation asset accounts will always have a negative balance to show a reduction in the value of the depreciable assets.
Task 6: Lodge sales tax and GST returns
Many businesses are required by the government to submit tax returns. To determine the amounts you need to include on your tax returns, you need to produce the tax reports that are available in your MYOB software.
To view a list of the tax reports, go to the Index to Reports window and select the GST/Sales Tax tab.
Task 7: Lock periods
After you have completed your month-end tasks, you should lock that month using the Lock Periods feature. This will prevent you from inadvertently making an entry in a month in which you do not want new entries.
- Go to the Setup menu and choose Preferences. The Preferences window appears.
- Click the Security tab.
- Select the Lock Periods: Disallow Entries Prior to option and choose the relevant date. This selection places a temporary lock on the period before that date. If you need to make an entry in a locked period at a later time?for example, you locked October, and now want to make an entry in September, you can unlock that period in the Preferences window.
Task 8: Backup and retrieve company data file
- Backup of company data file (.myo) is automatically done every time user logs out of MYOB Premier online and is kept for 7days. Data file will be kept in M drive’s Backup folder.
- The backup files will come with time-stamped prefix in this format: yyyymmddhhmmss_data file name.myo.
- To retrieve the backup data, you need to go to File menu and choose Open File, when the browser window appears, browse your M drive?s backup folder and select the company data file that you want to open.