You can customise a report, print it immediately and then revert the report to the original settings. Alternatively, if you want to retain a report's modifications, you can save it. The saved report will include advanced filters, report fields, and finishing options settings. When you save a customised report, it appears in the Custom view of the Index to Reports window. Note that you need to re-enter the report's date range the next time you print the report.
Follow the steps below to customise a report.
Task 1: Select the data to be printed
You can filter the amount of information that appears in your reports by choosing which categories or ranges of data should be included. For example, if you want to print a Sales Customer Summary report for a customer for the months May to July, you can use filters to select just that customer and just those months.
You can filter the information that appears in a report in either the Report Display window or the Report Customisation window.
To filter reports in the Report Display window
- Go to the Reports menu and choose Index to Reports. The Index to Reports window appears.
- Locate and highlight the report you want to customise.
-
Click Display. The Report Display window appears.

- Filter the report by making the required entries and selections in the toolbar that appears in the top section of the Report Display window. (Note, some reports do not have selection options.)
- Click Redisplay. The report is refreshed with the new filtering options applied. To make further filtering selections, see 'To filter reports in the Report Customisation window' below.
To filter reports in the Report Customisation window
- Go to the Reports menu and choose Index to Reports. The Index to Reports window appears.
- Locate and highlight the report you want to customise.
-
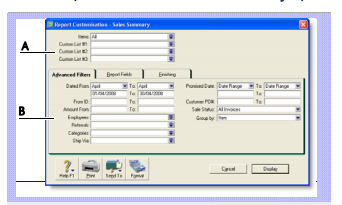
Click Customise. The Report Customisation window appears. The customisation options that appear depend on the report being customised. The following example shows the options available for the Sales Summary report.
-
The top section of the window enables you to limit the report to:
- a particular customer or supplier
- records with particular values in custom lists
- The bottom section has three tabs - Advanced Filters, Report Fields and Finishing. The Advanced Filters tab lets you set further limits on the data displayed (such as limiting records to those within a date range). The other two tabs are described later (see 'Select the required fields' below and 'Select finishing options').
- Specify your search criteria in the Advanced Filters tab.
Task 2: Select the required fields
In the Report Fields tab of the Report Customisation window, you can choose the fields to include on the report. For example, if you want to print the name of the salesperson in a sales report, you can add the salesperson field.
To select the required fields
-
Click the Report Fields tab.
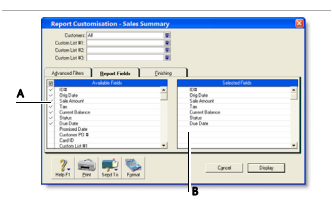
- Fields in the Available Fields column are those that are available for the selected report. To include a field in a new report, mark the field by clicking in the select column (
 ). This adds the field name to the Selected Fields column.
-
Fields in the Selected Fields column are those that will be printed on the selected report. From the top down, the sequence of fields in this column is in the order the fields will appear in the report. The first field will appear as the left most column of the report, the second field will appear in the next column to the right, and so on.
If you want to change the order in which the fields are printed, display the report and choose Screen Report from the View list. You can then drag the column headers to new positions. See 'To display and print reports'.
- Select the fields you want to appear on the report
Task 3: Select finishing options
The Finishing tab in the Report Customisation window provides a number of miscellaneous options, such as what default text to add to the report, whether you want the report added to the Reports menu, and so on. These options vary depending on which report you select.
To select finishing options
- Click the Finishing tab.
- If you want to add the customised report to the Reports menu so that you can re-use these customised settings, select the Add to Reports Menu option.
- [MYOB Premier range only] If you are on a network and want to prevent data from being changed when the report is being generated, select the Prevent Data Changes During Report Generation option. This will prevent other users from recording transactions or making other changes in the company file while the report is being printed.
- Make any other entries or selections that apply to the report.
Task 4: Change the report format
You can modify the look of the report by choosing different font styles, sizes, colours, alignments and effects, and by changing the report's page margins.
To change the report format
-
Click Format in the Report Customisation window. The Report Format window appears.

- Click the Report Line list, choose the section of the report you want to customise and then change the formats as required.
- The right side of the Report Format window shows a preview of the currently selected report section.
- To change the report's margins, make entries in the margin fields.
- If you have formatted a report and want to change it back to its original format, click Default.
- Click OK when you have finished formatting the report.
Task 5: Print the report
To print the report
- Click Display to display the report.
- To see how the report will look when printed, select Print Preview in the View field.
- To print the report, click Print.
Task 6: Save the report
If you plan to use a report's design and format again, you can customise the report once, save the changes and then re-use the report whenever you want. Once saved, you can access your custom report from the Custom tab in the Index to Reports window.
To save the report
- With the report displayed, click Save As. The Save As window appears.
- Enter a name and a brief description of the custom report and click OK. The Report Display window appears.
- Click Close. The Index to Reports window appears.
Note that the report you have just saved is now listed on the Custom tab. You can run the report again by selecting it from the Custom tab.
Changing the default fonts
Every report is assigned default fonts. You can change these default fonts if you prefer your reports to have a different appearance.
To change the default fonts
- Go to the File menu and choose Default Fonts. The Default Font Selection window appears.
- Click Reports. The Report Format - All Reports window appears.
- Choose the font style and size for the printed characters on your reports. The sample box previews the appearance of your choices.
- Click OK when you have finished.
NOTE : Changing the default fonts will not affect the fonts on any custom report.
 ) and then drag the column header to a new position.
 ) and then drag it to change the column's width. Only columns that have this icon can be resized.