2   Setting up your company file

Your MYOB software stores your financial data in a company file. If you do not already have a company file, you must create it before you can begin recording transactions.

Overview

When you create a company file, you record basic information about your business, such as the business name and your contact details. You must also specify the month and financial year in which you want to start recording transactions.

Depending on the features you want to use, there are some tasks that you should complete. This chapter guides you through the essential ones.

Essential tasks - The tasks you need to do depend on whether your accountant has created and set up a company file for you, the information you currently have and when your business started.

Advanced tasks - Once you have completed the essential tasks, you can start recording transactions. However, if you need to use the advanced features of this software, (such as the sales or inventory features) you will need to do further setup tasks. These tasks are covered in Chapter 3, 'Advanced setup,'.

Task
1 Create a company file
2 Activate the company file
3 Set up accounts
4 Enter account opening balances
5 Set up preferences
6 Set a password for the Administrator user ID

Create a company file

Create a company file

When you make entries in your software, that information is stored in a file called a company file.

You can create a company file using the New Company File Assistant. This assistant is a series of interactive windows that guide you through the process of creating a new company file.

NOTE : Please contact Singtel Help Centre for more information on using existing desktop file online.

Before you start, you need to know:

Your current financial year This is the financial year for which you want to start recording transactions in your company file. Note that a financial year is represented by the calendar year in which the financial year ends. For example, if your financial year ends in December 2009, your financial year is 2009.
The last month of your financial year This is the month in which your financial year ends. For most businesses, the last month is December.
Your conversion month This is the earliest month for which you want to record transactions. For example, if you want to enter transactions dated 1 September or later, your conversion month is September. You cannot enter transactions dated before the conversion month.
The number of accounting periods in your financial year You can choose to have 12 or 13 accounting periods. A 13th period is a period for recording entries which you do not want included in the accounting figures for a particular month. For example, you can use it to record year-end adjustments that are attributed to all months. If in doubt, choose 13 periods.
The default list of accounts that you want to start with Accounts are the categories that you will allocate each of your transactions to. When you create a company file, you need to select a default list of accounts. You can:
  • start with an accounts list provided by MYOB. You can select a predefined accounts list suitable for your business
  • build your own list. You can start with an accounts list that has the minimum required accounts and then add to it.
Note that you can modify your accounts list after creating your company file.

To create a new company file

  1. Start your MYOB software. A welcome window appears.
  2. Click Create new company file. The introduction page of New Company File Assistant appears.
  3. Click Next. The Company Information page appears.
  4. Enter your business contact and registration details.
  5. Click Next. The Accounting Information page appears.
  6. Enter your financial year details and conversion month.
  7. TIP : Current financial year Remember that this is the financial year for which you want to start recording transactions in your company file. It does not need to be the financial year that your business is currently operating in.

  8. Click Next. A confirmation page appears.
  9. Check the financial year and conversion month and then click Next. The Accounts List page appears.
  10. Select the default accounts list you want to start with.
  11. If you choose to... Continue with...
    start with an accounts list provided by MYOB step 10
    build your own list step 12
  12. Click Next. An accounts list selection page appears.
  13. Select the type of industry and business that best matches your own business.
  14. A suitable accounts list for the business type you selected appears. If you want to print the list, click Print. Later you can tailor the list to meet the needs of your business.

  15. Click Next. The Company File page appears
  16. If you want to change you company file name and location:
    1. Click Change. The New window appears.
    2. Select the required location.
    3. If necessary, type a new file name.
    4. Click Save. The Conclusion page appears.
    5. Continue with step 15 on page 14.
  17. Click Next. Your company file is created and the Conclusion page appears.
  18. Click Command Centre to display the Command Centre window.

Activate the company file

Activate the company file

Activation is a process that verifies you have a legal installation of your MYOB software. You can activate your company file online or via an automated service.

NOTE : Do you need to complete this task' You do not need to activate a company file that you have created for testing purposes or any file you are no longer entering transactions into.

After creating a company file, you can use it for 30 days in trial mode, after which you must activate the file if you want to continue entering transactions into it

If you do not activate the file within 30 days, it will become read-only, which means you can open, view, print and export information, but you will not be able to enter new information into the file until you activate it.

After activating a file, you must confirm the company file once or twice a year, that is, extend its activation throughout its working life. For more information, see 'Confirming activated company files'.

Activation limits You can initially activate up to two company files. If you need to create more than two company files (for example, yours is a bookkeeping business looking after many clients), you can obtain license extensions to activate as many additional company files as required. Contact SINGTEL customer service if you need a license extension. Only one file add-on at a time.

Activating after purchasing additional workstation licenses [MYOB Premier range only] When you purchase your MYOB software, the license allows one user to access a company file during the trial period. If you extend your license to support additional simultaneous users, you must activate your company file again. See also '[MYOB Premier range only] To obtain additional workstation licences'.

To activate a company file

  1. Open the company file to be activated and sign on. The Company File Activation window appears.
  2. Activate your company file:
  3. Method Steps
    Online
    1. Ensure you are connected to the Internet.
    2. Click I want to activate my company file online and then click Continue. The Company File Activation ' Online window appears.
    3. Click Continue to activate the file.
  4. Follow the on-screen instructions until the Command Centre window appears.
  5. If you want to activate another company file:
    1. Go to the File menu and choose Open. The Open window appears.
    2. b Open the company file to be activated and sign on to the file.
    3. Continue from step 2 above.

Set up accounts

Set up accounts

Accounts provide a means for grouping similar transactions. For example, if your business pays rent for the use of its premises, you would create a rent account and then allocate all rent payments to that account.

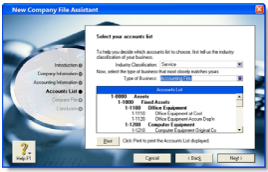
The accounts you use for your business are grouped in an accounts list.

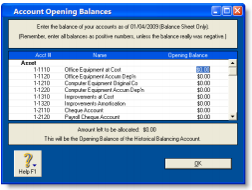
NOTE : Do you need to complete this task' In this case, go to 'Enter account opening balances'.

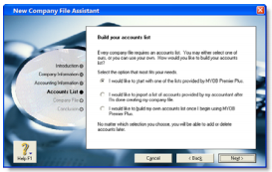
When you created your company file, you selected a default accounts list to start with. This list may already have the accounts you need. If not, you can change the list to suit your needs. If you are unsure, ask your accountant which accounts you should create, edit or delete.

Account numbers - Each account is identified by a unique five digit number. The first digit indicates the account's classification (for example, accounts starting with 1 are asset accounts). The remaining four digits determine its location within the classification. The lower the number, the higher up in the list it appears. For example, account 1-1100 appears above 1-1200.

Account classifications and types - The accounts list groups accounts into eight classifications'Assets, Liabilities, Equity, Income, Cost of Sales, Expenses, Other Income and Other Expenses. Within each account classification there is at least one account type.

Account classifications and types are described in the following table.

Classification Type Description
Asset(1-xxxx) Bank Money in the bank, for example, in a cheque or savings account.
Accounts Receivable Money owed to you by your customers.
Other Current Asset Assets that, if required, can be turned into cash within a year. These may include your term deposits.
Fixed Asset Assets which have a long life, for example, buildings, cars and computers. Fixed assets are usually depreciated.
Other Asset Other assets you own such as loans made to others and goodwill.
Liability (2-xxxx) Credit Card Repayments required to service credit card debt.
Accounts Payable Money owed by you to your suppliers.
Other Current Liability Money owed by you that is due in less than a year.
Long Term Liability Money owed by you that is due in more than one year, for example, a business loan
Other Liability Other money you owe.
Equity (3-xxxx) Equity The business's net worth, that is, its assets minus its liabilities. Common equity accounts are current year earnings, retained earnings and shareholders' equity.
Income(4-xxxx) Income Revenue from the sale of goods and services.
Cost of Sales(5-xxxx) Cost of Sales The direct cost of selling your goods and providing services, for example, purchase costs and freight charges
Expense(6-xxxx) Expense The day-to-day expenses of running your business, for example, utility bills, employee wages and cleaning.
Other Income(8-xxxx) Other Income Other revenues, for example, interest earned on savings and dividends paid from shares.
Other Expense(9-xxxx) Other Expense Other expenses, for example, interest charged.

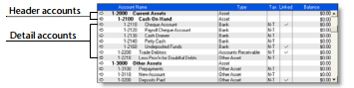
Header accounts - Your accounts list consists of detail accounts (the accounts to which you allocate transactions) and header accounts. Header accounts group related detail accounts to help you organise your accounts list.

For example, you could group your telephone, electricity and gas expense accounts using a Utilities header account. This makes it easier for you to locate the utility expense accounts in the accounts list and to see your combined utility expenses.

You group accounts by indenting the detail accounts located directly below a header account.

Note:

  • You cannot allocate transactions to a header account.
  • The balance of a header account is the sum of the detail accounts indented directly below it.
  • You can create up to three header account levels.

Setting up accounts

If you want to...
Create an account
Delete an account
Change the details of an account
Group detail accounts with a header account

To create an account

  1. Go to the Accounts command centre and click Accounts List. The Accounts List window appears.
  2. Click New. The Edit Accounts window appears.
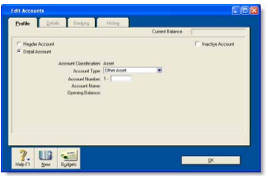
  3. If you want to create a detail account, select the Detail Account option.
  4. Select the account type from the Account Type list. The Account Classification field changes according to the selection you make. For more information on account classifications, see 'Account classifications and types'.
  5. Enter a four-digit number for the account in the Account Number field. The number must be unique within each account classification.
  6. Press TAB and type a name for the account.
  7. Click the Details tab.
  8. If you want, type a brief description of the account in the Description field.
  9. In the Tax Code field, select the tax code that you use most often with transactions that will be posted to this account.
  10. If you are creating an asset, liability or equity account (other than an asset that has the account type of Bank), select an option from the Classification for Statement of Cash Flows list. Classifying the accounts allows you to generate a statement of cash flows. This report shows how your cash position has changed over time, profit earned and where your cash was spent. If you're unsure about which classification to use, consult your accountant or an MYOB Certified Consultant.
  11. [MYOB Premier range only] If you enter transactions in multiple currencies, type or select the currency for transactions that will be posted to this account in the Currency field. You will need to have indicated that you deal in multiple currencies in your preferences. See 'Set up preferences'.
  12. If you are creating a bank or credit card account, and you want to keep a record of your bank account details, click the Banking tab and enter your account details.
  13. [Detail accounts only] If you want to enter historical balances, complete the Last FY column on the History tab. That way you can compare the year's monthly account balances with those of the corresponding months last year.
  14. [Detail accounts only] If you want to set up a budget:
    1. Click Budgets. The Prepare Budgets window appears.
    2. Type the budget amounts in the monthly columns.
    3. Click Close.
  15. Click OK when you have finished. The account you created now appears in your accounts list.

To group detail accounts with a header account

You group accounts by indenting the accounts located below a header account.

  1. Go to the Accounts command centre and click Accounts List. The Accounts List window appears.

Enter account opening balances

Enter account opening balances

Account opening balances are the balances of your accounts as of the first day of your conversion month.

NOTE : Do you need to complete this task' If you were in business prior to your conversion month, most of your accounts probably already have balances. If you want to produce financial reports that included these balances (such as a balance sheet), or you want to track the balance of accounts with a cumulative balance (such as your bank account), you need to enter these balances.

You can find your account opening balances on a trial balance report, a balance sheet or a profit & loss report prepared for the period immediately prior to your conversion date. You can ask your accountant to prepare these reports.

You may also be able to find your account opening balances using your previous software or paper-based records.

The balances you enter depend on whether your conversion month is also the first month of your financial year. If your conversion month:

  • is the first month of your financial year, enter the opening balances of your asset, liability and equity accounts only. The opening balances of your income, cost of sales and expense accounts should be zero.
  • is not the first month of your financial year (for example, if your financial year starts in April but your conversion month is January), enter the opening balances of all your accounts.

Opening bank account balances - You can enter either of the following amounts as the opening balance of a bank account:

  • the bank account balance that appears on your balance sheet or trial balance reports as of the day prior to your conversion date. For example, if your conversion date is 1 January 2009, this is the bank account balance as of 31 December 2008. These reports can be provided by your accountant, or, if you were previously using another accounting software, printed using that software.
  • the cashbook balance of the account as of the end of the day prior to your conversion date. You can calculate your cashbook balance by taking into account the transactions not yet cleared by your bank as of the conversion date and the balance that appears on your bank statement at that date.

For example, assume that $500 worth of deposits and $1000 worth of payments were unpresented as of your conversion date (that is, they had not appeared on a bank statement). The cashbook balance would be calculated as shown below:

Bank statement balance as of the conversion date $21,000.00
ADD uncleared deposits + $500.00
SUBTRACT uncleared payments

'

$1,000.00

Cashbook balance as of the conversion date $20,500.00

To enter opening balances

  1. Go to the Setup menu, choose Balances and then Account Opening Balances. The Account Opening Balances window appears.
  2. Enter the balances in the Opening Balance column.
  3. NOTE : You should enter opening balances as positive numbers Do not, for example, enter your liability account balances as negative numbers. Enter negative amounts only if accounts truly have negative balances. As a rule, these will be asset accounts that record accumulated depreciation.

  4. Check that the amount in the Amount left to be allocatedfield at the bottom of the window shows $0.00.
  5. If this field displays an amount other than $0.00, check your opening balances again because they are either incomplete or incorrect. However, you can continue the setup process if there is an amount in the Amount left to be allocated field. The amount will be assigned to a special equity account called Historical Balancing.

  6. Click OK.

Set up preferences

Set up preferences

Preferences are settings that enable you to tailor yoursoftware to your business requirements and processes.

NOTE : Do you need to complete this task' While you can complete this step later, you should review the default preferences that have been set before you start entering transactions.

You can set preferences to customise the way your software operates. For example, you can choose to automatically print invoices after recording them, or prevent users from editing transactions.

You can set up your preferences using the:

  • Customise Easy Setup Assistant. This assistant guides you through setting up some key preferences. To access the assistant, go to the Setup menu, choose Easy Setup Assistant and then click Customise.
  • Preferences window. This window lists all of the preferences. To view this window, go to the Setup menu and choose Preferences.

Some preferences you should consider choosing include:

  • Use Audit Trail Tracking If you want to keep a record of transactional, tax, payroll (MYOB Premier Plus only), account and system changes, select this option. This is useful if more than one person will be entering transactions into your file. For more information about audit trail tracking, see 'Auditing your records'.
  • Transactions CAN'T be Changed; They Must be Reversed If you do not want to allow users to edit or delete transactions, select this option. If they want tochange or delete a transaction, they will need to do so by recording a reversal transaction. For more information, see 'Reversing a transaction'.
  • Also, an audit trail entry is created when you select this option and edit a Receive Items transaction. The original transaction is reversed, locked and a new transaction is recorded that includes the changes you have made.

  • I Deal in Multiple Currencies [MYOB Premier range only] If you want to enable multi-currency accounting, select this option. For more information about working with multiple currencies, see 'International transactions'.

Set a password for the Administrator user ID

Set a password for the Administrator user ID

When you created your company file, a user ID called Administrator was automatically created.

A user ID is the means for:

  • controlling access to a company file
  • tracking a transaction record history
  • saving individual preferences.

By default, the Administrator user ID does not have a password assigned to it. Anyone who signs on with the Administrator user ID will have complete access to all command centres, functions and windows and will be able to create, edit and delete other user IDs.

For that reason, as soon as you create a company file, you should assign a password to the Administrator user ID; otherwise, anyone can sign on and then enter, edit and delete transactions in your file.

To set a password for the Administrator user ID

  1. Start your MYOB software and click Open your company file in the welcome window that appears.
  2. In the Open window, select the company file to be opened, and click Open. The Sign-on window appears
  3. Click Change Password.
  4. In the Change Password window, leave the Existing Password field blank, type the password in both the New Password and Confirm Password fields.
  5. Click Record.

NOTE : Access restrictions If you want to restrict other users from accessing certain features or information, you can create additional user IDs and specify their access restrictions. For more information, see 'Managing user accounts'.