In your MYOB software, the term receiving money refers specifically to recording receipts other than payments relating to invoices. These include equity injections, interest, adjustments and so on. These types of receipts can be entered using the Receive Money window or by selecting the Receive Money transaction type in the Bank Register window.
Note that in your MYOB software, invoices are processed through the Sales command centre. So any payments received against invoices you have issued need to be entered using the Receive Payments window or by selecting the Receive Payment transaction type in the Bank Register window. See 'Receiving payments'for more information.
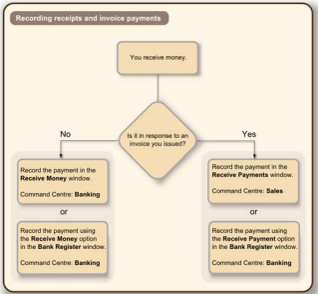
The options for recording receipts and invoice payments are summarised in the following diagram.
Printing payment receipts You can print payment receipts for transactions that you enter in the Receive Money and Bank Register windows. For more information about printing payment receipts, see 'Printing payment receipts.
There are two ways to record money received without an invoice:
- in the Receive Money window
- in the Bank Register window.
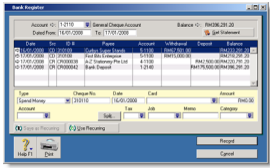
The Receive Money window lets you record more details about the receipt and to allocate the receipt to more than one account. This is the procedure covered in this section. If you want to use the Bank Register window - which lets you enter a receipt with minimum details - see 'To enter a transaction in the Bank Register window'.
To record money you receive
- Go to the Banking command centre and click Receive Money.
- Choose one of the following options:
- Deposit to Account. In the Deposit to Account field, type or select the required bank account.
- Group with Undeposited Funds. Choose this option if you want the deposit to be recorded in the undeposited funds account. After you have grouped all the deposit transactions you want, you can make one bank deposit for all the undeposited funds. For more information, see 'Preparing a bank deposit'
- If the deposit amount includes tax, select the Tax Inclusive option. If it excludes tax, deselect this option.
- In the Payor field, type or select the payor's name.
- Enter the amount received.
- [Optional] In the Payment Method field, select the payment method.
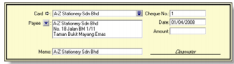
- [Optional] To record additional details about the payment, such as a cheque number, click Details and record the details in the Applied Payment Details window that appears.
- Type the date of the payment.
- [Optional] Type a detailed comment in the Memo field to help you identify the payment later.
- Allocate the amount to the appropriate account or distribute it to a number of accounts, as described in the table below.
- If you want to view or change the tax amounts assigned to the transaction, click the zoom arrow
 .
. - If you want to assign the transaction to a particular category, select a category from the Category list.
- If you want to store the transaction as a recurring transaction, so that you can use it again, click Save as Recurring. In the Edit Recurring Schedule window, enter the necessary details and click Save. (For more information, see 'Recurring transactions'.)
- Complete the transaction in any one of the following ways:
- To print and record the transaction, click Print.
- To record the transaction, click Record.
- If you do not want to record the transaction at this time, click Cancel.

| A | Type or select an account to assign the payment or part of the payment to. |
| B | Type the amount you want to assign to each account. The total amount in this column must equal the amount in the Amount Received field before you can record the transaction. |
| C | [Optional] Assign the amount to a job by entering the job code here. |
| D | [Optional] Type a memo for each entry in the transaction. |
| E | The tax code that is linked to the allocation account appears here automatically. You can change it or delete it if necessary. |
If you have not turned on category tracking, the Category field won't appear. (To turn on category tracking, go to the Setup menu, choose Preferences, click the System tab and select the Turn on Category Tracking option.) For more information, see 'Categories'.


 next to it. The transaction line is highlighted and the amount in the alculated Statement Balance field is updated.