6   Purchases

This chapter explains how to enter information about your purchases. You record a purchase by specifying the supplier details, the purchase form layout (item, service, professional or miscellaneous), status of the purchase (quoted, ordered or billed) and details of the purchased items or services.

This chapter also explains how to pay your suppliers for these purchases, how to deal with a supplier who owes you money (settling a supplier debit) and how to analyse your entire purchasing activity with a variety of reports and analytical tools.

Creating a supplier card

Before you can record a purchase order, you need to create a card for your supplier.

To create a supplier card

  1. Go to the Card File command centre and click Cards List. The Cards List window appears.
  2. Click New. The Card Information window appears
  3. Select Supplier from the Card Type list.
  4. Select the designation of the card: company or individual.
  5. Type the name of the supplier and press TAB. Additional fields appear.
  6. Enter a code to identify this supplier in the Card ID field. For more information, see 'Card identification codes'.
  7. Enter contact details for the supplier
  8. If you want to enter more contact information, select Address 2 from the Locations list and enter the additional details. You can enter contact details for five locations.

  9. Click the Card Details tab. You can enter notes about the supplier, insert a picture and assign attributes to group and sort the card.
  10. If you want to
    assign identifiers to the card
    assign an attribute from a custom list
    enter additional information in a custom field
  11. Click the Buying Details tab and enter your buying details.
  12. A Buying information The selections you make here will be used, by default, on quotes, orders and bills that you create for this supplier. You can override these selections when recording the purchase.
    B Credit terms The credit terms you entered earlier appear here by default. You can override them here for this supplier. The credit terms entered here are used as the default terms for all purchases from the supplier, but can be changed at any time.
    C Tax information The supplier's tax information is entered here. If the supplier's tax status takes precedence over that of the item or service being sold, select the Use Supplier's Tax Code option. For more information, see 'Assigning tax codes to cards'.
  13. [Optional] Click the History tab and type the dollar value of the purchases made prior to your conversion month. You can also type or select the date that the contact became a supplier.
  14. Click OK to close the Card Information window.

Entering purchases

You can enter a purchase as a quote, order, receive item or bill.

  • You can enter a quote to store an estimate or quote you received from one of your suppliers. A quote has no impact on your inventory levels and can be changed to an order or a purchase when you are ready to purchase.
  • An order is a purchase where no service or item has been received. While orders do not affect your financial figures, they are included in your inventory reports. Orders do not create transactions unless you have paid a deposit to the supplier. An order can be changed to a purchase but not to a quote.
  • A receive item purchase records the receipt of items you have ordered but have not yet been billed for. When you record items received, the item is added to your inventory and the cost of the item is added to an accrual account for inventory items until you record a purchase for it. You record items received against an order.
  • A bill is usually created when you receive the items or services you ordered and are required to pay the supplier (that is, you have been charged for the purchase). Recording a bill will update the appropriate accounts, including the account for tracking payables. Bills can be open (unpaid), closed (paid) or debit (negative purchase). A bill cannot be changed to a quote or an order.

You can enter a purchase in:

  • the Purchases window
  • the Bank Register window

The procedure described in this section is for entering purchases in the Purchases window, which enables you to record full details about a transaction.

Bank Register window Entering a purchase in the Bank Register window is a fast way to enter a purchase transaction. However, you can enter less detail about the purchase than if you entered it in the Purchases window. For more information, see 'To enter a transaction in the Bank Register window'.

Entering a purchase transaction

Complete the following steps to enter a purchase transaction:

Task
1 Enter information about the supplier
2 Choose the type of purchase
3 Enter the items or services you are purchasing
4 Enter additional information about the purchase
5 Complete the purchase

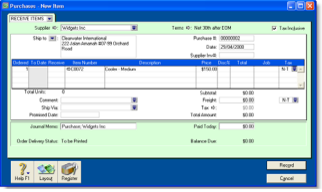
Task 1: Enter information about the supplier

  1. Go to the Purchases command centre and click Enter Purchases. The Purchases window appears.
  2. In the Supplier field, select the supplier's name.
  3. The terms shown in the Purchases window are the terms recorded in the supplier's card.

  4. Complete the fields as described in the table below.
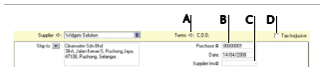
  5. A Click the zoom arrow to alter the terms for this purchase only. If you want to change the credit terms for all future purchases to this supplier, you must make that change on the Buying Details tab of the supplier's card.
    B Type the purchase order number or accept the default number in the Purchase # field.
    C If the supplier gave you an invoice number, enter it in the Supplier Inv# field.
    D If the purchase amounts you want to enter include tax, select the Tax Inclusive option. Do not change this option after entering an amount in the Amount column.

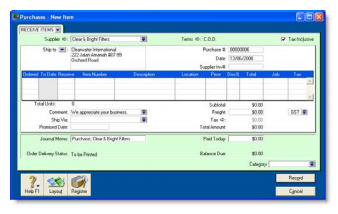
Task 2: Choose the type of purchase

Choose the status and layout for the purchase. The default layout displayed in the Purchases window is determined by the selection you made when you set up purchase details (using the Purchases Easy Setup Assistant) or created the supplier's card.

  1. Check whether the default layout is appropriate.
  2. There are four layouts to choose from: Service, Item, Professional and Miscellaneous. To change the default layout:

    1. Click Layout. The Select Layout window appears.
    2. Choose the layout you want to use and click OK.
  3. Select the status from the list in the top left corner of the window: Quote, Order, Receive Item or Purchase. Receive Item only appears if you choose Item layout.

Task 3: Enter the items or services you are purchasing

The scrolling list in the middle of the Purchases window is where you enter details of what you are buying. In this area, you enter item numbers, descriptions, account numbers (or account names, depending on your selection in the Preferences window) and other information about your transaction.

One row in the scrolling list is one line item of the transaction. You can enter as many line items for a purchase as you want.

The fields in the scrolling list differ according to the type of purchase you are creating. The following illustration shows the fields for a purchase with an Item layout and a Bill status.
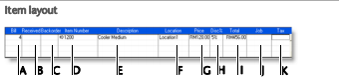
A Bill The quantity you have been invoiced for
B Received This field is read-only. It displays the quantity of items received. For more information, see 'Receiving items without a supplier invoice'.
C Backorder The quantity of the item back ordered. An order for this amount will be created automatically when you click Record.
D Item number Pressing TAB here displays the item list from which you can choose the item being purchased.
E Description A description of the item appears automatically. You can change this if you want.
F Location [MYOB Premier range only] If you store this item in multiple locations, you can select the location where the item will be received. For more information, see 'Multiple inventory locations'.
G Price The price of the item appears automatically. You can change this if you want.
H Disc% [Optional] The volume discount as a percentage.
I Total The total price is calculated automatically.
J Job [Optional] Selecting a job number here assigns a line item to a specific job. For more information about jobs, see 'Setting up jobs and sub-job'.
K Tax Type or select a tax code for the line item.

The following illustration shows the fields for a purchase with a Service layout and a Bill status. This also applies to the Professional and Miscellaneous layouts.
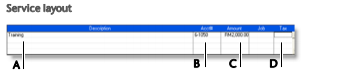
A Description A description of the goods or services purchased.
B Acct # or Account Name The account to assign to the purchase. Pressing TAB here displays the accounts list from which you can choose an account. This should be an expense or cost of sales account. You should not select your payables account for ordinary purchases.
C Amount The amount you have been invoiced.
D Tax Type or select a tax code for the line item.

NOTE : Add lines, subtotals and headers to purchases You can add lines, headers and subtotals to purchases to make it easy to separate and subtotal different groups of line items on one purchase. For more information, see 'Adding lines, headers and subtotals to purchases'.

Task 4: Enter additional information about the purchase

The fields that appear at the bottom of the Purchases window differ, depending on the type of purchase you are creating.
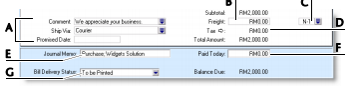
A Optional fields Enter optional details, such as a comment, shipping method and the date the goods or services were promised.
B Freight Type any charges for freight.
C Freight tax Type or select the tax code for the freight charges.
D Tax Click the zoom arrow if you want to view or change the tax amounts assigned to the sale
E Journal Memo The journal memo is generated automatically. You can change it if you want.
F Paid today Type an amount here to indicate how much money you paid at the time of the purchase or, if you are creating an order, how much money you gave as a deposit.
G Bill Delivery Status If you want to print or email the purchase in a batch, select the required delivery method from the list. For more information, see 'Sending forms in a batch'.

NOTE : Recap transaction Before you record this transaction, you can use the recap transaction feature to view the journal entries that will be created when the transaction is recorded. This is useful for confirming that the journal entries are posted to the correct accounts. To recap, choose Recap Transaction from the Edit menu.

Task 5: Complete the purchase

After you have finished entering the details in the Purchases window, there are several ways to complete the transaction.

TIP : Save the purchase as a recurring purchase Click Save as Recurring. In the Edit Recurring Schedule window, enter the necessary information and click Save. For more information, see 'Recurring transactions'.

  • If you want to record the purchase without printing or sending it, click Record.
  • If you want to record the purchase and print, send or save it as a PDF, complete the relevant procedure below.
To Do this
Print Click Print and choose the type of form you want to use. For more information about printing, see Chapter 13, 'Forms,'.
Print preview Click Print and choose Preview to preview the purchases form for this transaction. Note that the transaction will be recorded before the form is displayed.
Email Click Send To and choose Email. Review and make entries in the Email window and click Send. The email, which will include a PDF (Portable Document Format) attachment, will be sent to the Outbox of your default email software. Send the email from your email software.

To delete a blank line, line item, header or subtotal

  1. In the Purchases window, click anywhere on the blank line, line item, header or subtotal you want to delete.
  2. Go to the Edit menu and choose Delete Line.

Adding lines, headers and subtotals to purchases

You can add lines, headers and subtotals to purchases.

To insert a blank line

  1. In the Purchases window, click in the line below where the blank line is to appear.
  2. Go to the Edit menu and choose Insert Line.

To insert a header

You can group several line items by inserting a header.

  1. In the Purchases window, click in the line below where the header is to appear
  2. Go to the Edit menu and choose Insert Header. A blank line will appear in the scrolling list with the cursor positioned in the Description column.
  3. Type the text for the header. The text appears in grey.
  4. Press TAB to complete the header entry.

To insert a subtotal

  1. In the Purchases window, click in the line below the items to be subtotalled.
  2. Go to the Edit menu and choose Insert Subtotal. A line appears displaying the subtotal of the individual amounts that appear above the subtotal line and below the last subtotal, if there is one.

To delete a blank line, line item, header or subtotal

  1. In the Purchases window, click anywhere on the blank line, line item, header or subtotal you want to delete.
  2. Go to the Edit menu and choose Delete Line

Receiving items without a supplier invoice

If you receive items from a supplier and have not been invoiced for them, you may not know the actual amount payable to the supplier. However, if you inventory these items, you will need to add them to your on-hand inventory before you can sell them. But, as you do not know the amount payable, you shouldn't record an amount owed to the supplier at this time.

Instead, you can record the receipt of these items using a purchase transaction with a Receive Item status. When you record a purchase with a Receive Item status, you enter an estimated purchase amount, which is then allocated to an accounts payable accrual account. Your accounts payable is not affected at this time.

Later, when your supplier invoices you for the items, you can record a bill with the actual purchase amount. When you record the bill, the actual purchase amount is allocated to your accounts payable and the estimated amount is removed from the accrual account. Before you can record items received without a supplier invoice, you need to set up an accrual account for them.

Setting up an accrual account for items received without a supplier invoice

When you record items received without a supplier invoice, you need to allocate the anticipated purchase amount to a creditors accrual account.

If the account doesn't exist, you need to create it. The account should be a liability account named, for example, APAccrual - Inventory. For information on creating an account, see 'To create an account'.

Before you can allocate transactions to this account, you need to make it the default linked account for items received without a supplier invoice.

To link an account for items received

  1. Go to the Setup menu, choose Linked Accounts and then Purchases Accounts. The Purchases Linked Accounts window appears.
  2. Select the I can receive items without a Supplier bill option.
  3. In the Liability Account for Item Receipts field that appears, type or select the accrual account, for example, APAccrual - Inventory.
  4. Click OK

Recording items received without a supplier invoice

You need to record items received against a supplier purchase order. If the order already exists, simply record the items received against the order. If no order exists, you can create one when you record the items received.

To record items received against an order

You can record items received against an existing order in the Purchases window or from the Purchases Register window.

  1. Locate the order:
    • In the Purchases window, type or select the name of the supplier whose order you want to update. Select the order from the list that appears and click Use Purchase, or
    • In the Purchases Register window, click the Orders tab. Find the required order and highlight it.
  2. Click Receive Items. The Purchases window appears with the Receive Item status.
  3. In the Receive field, type the item quantity received.
  4. 4 [MYOB Premier range only] If you keep items at multiple locations, type the location where you received the items in the Location field, or select it from the list. Note that the Location field only appears if you have multiple locations.
  5. Click Record. The items are recorded in your inventory and the original order is updated with the number of items received.
  6. When you receive the supplier's bill, you need to convert the order to a purchase. For more information, see 'To convert an order to a bill'.

To create an order when you record items received

If there is no purchase order for the items received, you can create an order when you record the receipt.

  1. Go to the Purchases command centre and click Enter Purchases. The Purchases window appears.
  2. NOTE : Recording items received from the Inventory command centre You can also record items received by clicking Receive Items from the Inventory command centre. The Purchases window appears with the Receive Item purchase status.

  3. In the Supplier field, type the supplier's name, or select it from the list.
  4. If the Item layout does not appear:
    1. Click Layout. The Select Layout window appears
    2. Select Item and then click OK.
  5. Select Receive Items from the status list in the top-left corner of the window.
  6. Enter the purchase date and your order number.
  7. In the Ordered field, type the quantity you ordered. This can be more than the quantity received.
  8. In the Receive field, type the quantity received.
  9. In the Item Number field, type the number of the item received, or select it from your items list.
  10. [MYOB Premier range only] If you keep items at multiple locations, type the location where you received the items in the Location field, or select it from the list. Note that the Location field only appears if you have set up multiple locations.
  11. In the Price field, enter the estimated price for the items.
  12. Click Record. The items are recorded in your inventory and a purchase order is created with the number of items received.
  13. When you receive the supplier's bill, you need to convert the order to a purchase. For more information, see 'To convert an order to a bill'.

Creating a purchase order from a sale

If you want to order items to fulfil a sale, you can create a purchase order using sales quote or sales order details that you have recorded.

To create a purchase order from a sale

  1. Go to the Sales command centre and click Sales Register. The Sales Register window appears.
  2. Locate and select:
    • a quote-click the Quotes tab and select the required quote
    • an order-click the Orders tab and select the required order.
  3. Click Create PO. The Purchases window appears with the new purchase order displayed. The items you entered for the sale automatically appear as line items on the purchase order
  4. Select a supplier in the Supplier field. Note, if you have nominated a supplier for these items in the item setup, this supplier will appear by default.
  5. Enter the cost of the items in the Price column
  6. Complete the purchase order as you normally would. For example, you may want to change the transaction date to today's date, or add items to the order.
  7. Click Record. The new purchase order is created and the original sales quote or order remains in the Sales Register window.

Changing the status of a purchase

If you enter a quote or an order, you can easily convert it to a bill once the amount is payable. A quote can be converted to an order or a bill. An order can only be converted to a bill. Quotes and orders must be converted to bills to show as payable.

To convert a quote to an order or a bill

You can convert a quote to an order or a bill from the Purchases window or from the Purchases Register window.

  1. Go to the Purchases command centre and click Purchases Register. The Purchases Register window appears.
  2. Click the Quote tab.
  3. Find the required quote and select it.
  4. If you want to convert the quote to:
    • an order, click Change to Order. The Purchases window appears.
    • a bill, click Change to Bill. The Purchases window appears
  5. If you want to, you can update the information in the Purchases window, such as the transaction date.
  6. Click Record. The bill or order is recorded.
  7. The original quote will remain in the Purchases Register window unless you have indicated in the Preferences window that you want quotes to be deleted once they are recorded as orders or bills.

To convert an order to a bill

You can convert an order to a bill in the Purchases window or from the Purchases Register window. If you want to convert several orders to bills simultaneously, see 'To simultaneously convert several orders to bills'.

  1. Go to the Purchases command centre and click Purchases Register. The Purchases Register window appears.
  2. Click the Orders tab.
  3. Find the required order and select it.
  4. Click Change to Bill. The Purchases window appears, displaying the bill.
  5. If you want to, you can update the information in this window, such as the transaction date.
  6. Click Record. A new bill is recorded and the original order is removed from the Purchases Register.

To simultaneously convert several orders to bills

You can simultaneously convert several orders to bills in the To Do List window.

  1. Click To Do List from any command centre. The To Do List window appears.
  2. Click the Orders tab to display a list of all your orders.
  3. If you want to view details about a specific order, click the zoom arrow to the right of the supplier's name.

  4. Select the orders you want to convert to bills by marking the select column .
  5. Click Record as Actual.
  6. In the window that appears, enter a date for the selected transactions. This is the date that the transactions will be recorded in your accounts.
  7. Click OK.

Reviewing your purchase information

There are several tools that you can use to review your purchases information.

Tool Description
Business Insights Use Business Insights to analyse purchases and supplier information.
To Do List The To Do List displays all open purchases, recurring purchases and orders, sorted by due date.
Analyse Payables The Analyse Payables window provides details of your purchase activities.
Purchase reports Purchase reports help you keep track of your purchase activities.
Purchase history Purchase history lets you view seven years of purchase history for an item or a supplier.
Find Transactions The Find Transactions window helps you find purchase transactions quickly.
Purchases Register The Purchases Register window gives you a complete picture of your purchase activity-open and closed purchases, orders, quotes, returns, and so on.
Transaction Journal The Transaction Journal window lists journal entries of your purchases and other transactions.

To view purchases information using Business Insights

Business Insights presents a summary of your purchases information, including which suppliers you owe money to and how much is overdue. You can also see how much you owe suppliers for each ageing period, as well and view your purchases history with your suppliers

To find information specific to your needs, sort the table columns by clicking a column heading. For example, you can find the most overdue supplier payments or the largest overdue amounts.

  1. Go to the Accounts command centre and click Business Insights. The Business Insights window appears.
  2. View the Suppliers I need to pay panel.
  3. This panel shows the total payments you owe suppliers and details of each overdue supplier payment (based on their credit terms), including the number of days overdue.

  4. Click Analyse suppliers to view graphs and information about the money you owe suppliers and the payment history of each supplier.
  5. You can use this information to:

    • Keep on top of your supplier payments Identify which supplier payments are due or which suppliers you owe the most money to.
    • Negotiate a payment or discount with a supplier View your payment history with the supplier, such as the average number of days it takes you to pay them.
  6. If you want to use one of the graphs or tables in another document, right-click it and choose:
    • Copy to Clipboard. This copies the graph or table to the clipboard, ready to paste into a document. Note that you can edit table information after it is pasted in a document.
    • [Graphs only] Save As. Choose where you want to save the image and click Save. This saves the graph as an image file, so you can use it later.
  7. Click Close to return to the main Business Insights window.

For more information about the calculations shown in Business Insights, see the Help Centre.

To view a list of all unpaid bills sorted by days overdue

You can view a list of all unpaid bills in the To Do List and enter supplier payments for those purchases.

  1. 1 Click To Do List in any command centre. The To Do List window appears.
  2. Click the A/P tab. A list of all unpaid purchases appears.
  3. The Overdue column shows the number of days a bill is overdue (a negative number in the Overdue column indicates that the payment is not yet due). The number of days a bill is overdue is calculated by checking the original date of purchase, comparing it to today's date and looking at your credit terms with the supplier.

To analyse payables

The Analyse Payables window enables you to view detailed information about how much you owe suppliers and how long you have owed them. This analysis is based on all purchases and payments recorded in your company file.

  1. Go to the Purchases command centre and click Analysis. The Analyse Payables window appears.
  2. Click Filters. The Ageing Date window appears.
  3. Set your filters in the Ageing Date window and click OK.
  4. Select the required view of the Analyse Payables window:
    • The Summary view displays all the money that you owe suppliers, totalled by supplier.
    • The Supplier Detail view displays all the money that you owe the supplier selected in the Supplier Detail field.
    • The Purchase Detail view displays all the transactions assigned to the purchase selected in the Purchase Detail field.
    • The information in this window is based on the entries you made above in the Ageing Date window, and the selections you made in the Ageing fields in the Reports & Forms tab of the Preferences window.

To view purchase reports

There are several purchase reports that can help you track your purchase activity. For example, you can run a Payables Reconciliation Summary report if you want to analyse your payables at a given date. The Analyse Purchases Items Spreadsheet report shows you the inventory items which are costing you the most money.

  1. Go to the Reports menu and choose Index to Reports. The Index to Reports window appears.
  2. Click the Purchases tab. A list of purchase reports appears. For information on displaying, customising and printing your reports, see Chapter 12, 'Reports,'.

To view purchase history

You can view the purchase history for an item or a supplier.

  1. Display the Item Information window for an item or the Card Information window for a supplier.
  2. Click the History tab.

Paying bills

If you have recorded a bill, you pay the supplier in the Pay Bills window. In this window you can record the payments to one or more of your outstanding bills.

You can also make payments to suppliers in the Bank Register window, especially if you have several bills to pay and do not need to record detailed information for each payment.

When you use the Bank Register window to make supplier payments, the entire payment is automatically allocated to the oldest bill first. For more information, see 'Entering transactions in the Bank Register window'.

You can pay several outstanding bills at once in the To Do List window. For more information, see 'To pay several bills at once'.

The options for recording payments are summarised in the following diagram.

To pay bills

  1. Go to the Purchases command centre and click Pay Bills. The Pay Bills window appears.
  2. If you want to change the default account to pay the bill, type or select a different account in the Account field.
  3. Type the supplier's name or select the supplier from the list using the search icon .
  4. NOTE : If you receive an alert message If you have outstanding supplier debits with this supplier, a message may appear. You will have the opportunity to settle the supplier debits immediately or at a later date. See 'Settling supplier debit'.

  5. [Optional] Change the memo and payment date if necessary.
  6. In the scrolling list in the bottom half of the window, indicate which bills are covered by the payment by entering amounts in the Amount Applied column.
  7. A Pay All Click Pay All if you are settling your account in full. The total payment amount appears in the Amount field and the individual payment amounts are applied to each open bill.
    B Discount If you are taking an early-payment discount for a purchase, assign the discount to the appropriate bill in this column. Note that you cannot assign a discount to a bill that you are not settling in full. If this is the case and you want to record a discount that the supplier has given you, you can create a supplier debit. See 'Creating supplier debits'.
    C Amount Applied The amount of the payment you want to apply to each bill. The amounts you apply in this column are accumulated in the Total Applied field.
    D Finance Charge If part of the payment was used to pay finance charges, enter the finance charge amount here.
    E Out of Balance The Out of Balance amount must be zero before you can record the transaction. This field will show an amount if there is any variance between the Total Paid amount and the Amount field in the top half of the window. If this happens, correct the amounts in the Amount Applied and Finance Charge fields.
  8. If you are recording a cheque payment and the cheque has already been written, or if you are recording a transaction that doesn't require a printed cheque (such as a petty-cash payment or Internet payment), select the Cheque Already Printed option.
  9. If you want to send remittance advice in a batch, select an option from the Remittance Advice Delivery Status list.
  10. After you have recorded a number of payments, say, the day's payments, you can print or email remittance advices in a batch. For more information, see 'Forms'.

  11. If you want to preview the remittance advice or cheque for this transaction, click Print and then choose Preview Cheque or Preview Remittance Advice. Note that the transaction is recorded before it is displayed.
  12. If you want to print a cheque or remittance advice now, click Print and select the form type you want to print. Note that the payment is recorded before it is printed.
  13. Click Record.

To pay several bills at once

You can pay several bills at once in the To Do List window. The linked account for paying bills will be used for all supplier payments made from this window.

  1. Click To Do List in any command centre. The To Do List window appears.
  2. Click the A/P tab. A list of all unpaid bills appears
  3. If you want to view details about a specific purchase, click the zoom arrow next to the bill.
  4. Click in the select column next to each bill you want to pay.
  5. Click Pay Bills.
  6. In the window that appears, enter a date for the selected transactions. This is the date that the transactions will be recorded in your accounts.
  7. Click OK and then click Close.

Creating supplier debits

A supplier debit is money that a supplier owes you.

Recording supplier debits

You can create a supplier debit in one of two ways:

  • Reverse an existing purchase. Use this method if you have been debited for the entire purchase.
  • Manually create a debit. Use this method if you have been debited for part of a purchase.

To reverse an existing purchase

Your company file transactions must be set to unchangeable before you can reverse a purchase; that is, the Transactions CAN'T be Changed; They Must be Reversed option must be selected in the Security tab of the Preferences window.

  1. Find and display the purchase. For more information, see 'Finding a transaction'.
  2. Go to the Edit menu and choose Reverse Purchase. A supplier debit appears in the Purchases window.
  3. If you want, you can make some changes to the supplier debit (such as changes to the date and memo), but you cannot change the accounts, amounts and quantities that are associated with the debit.
  4. Click Record Reversal.

To manually create a debit for a non-item purchase

  1. Go to the Purchases command centre and click Enter Purchases. The Purchases window appears.
  2. In the Supplier field, type the supplier's name or select it from the list.
  3. The terms and delivery address shown in the Purchases window are the details recorded in the supplier's card.

  4. Select Bill from the list in the top left corner of the window.
  5. Click Layout, select Miscellaneous and then click OK.
  6. In the Description field, type the reason for the supplier debit.
  7. In the Acct # field, type the account number to be debited or select it from the list. This is normally an expense account called Purchases Returns.
  8. In the Amount field, type the amount of the debit as a negative amount.
  9. Click Record.

To manually create a debit for an item purchase

  1. Go to the Purchases command centre and click Enter Purchases. The Purchases window appears.
  2. In the Supplier field, type the supplier's name or select it from the list. The terms and delivery address shown in the Purchases window are the details recorded in the supplier's card.
  3. Select Bill from the list in the top left corner of the window.
  4. Click Layout, select Item and then click OK.
  5. In the Bill field, type the quantity of the item you are returning as a negative number.
  6. In the Item Number field, type the item number or select it from the list. The cost of the item is displayed as negative amount in the Total field.
  7. Click Record.

Settling supplier debits

You can settle a supplier debit in one of two ways:

  • Apply the debit to an unpaid purchase. Use this method to apply the supplier debit to one or more of your unpaid purchases from the supplier, or
  • Receive a refund. Use this method to record the receipt of a refund cheque from the supplier.

To apply a supplier debit to an unpaid purchase

  1. Go to the Purchases command centre and click Purchases Register. The Purchases Register window appears.
  2. Click the Returns & Debits tab.
  3. Select Supplier from the Search By list. Enter the supplier's name in the adjacent field. A list of debits for that supplier appears.
  4. Highlight the debit you want to apply and click Apply to Purchase. The Settle Returns & Debits window appears, listing all open purchases that you have made from the supplier.
  5. Enter the amount you want to apply to a purchase in the Amount Applied column.
  6. If the Apply Supplier Payments Automatically to Oldest Bill First preference is selected in the Purchases view of the Preferences window, amounts will appear next to the oldest purchase in the Amount Applied column. You can apply the debit amount to any one transaction or you can split it over any of the transactions in the list, but the total amount you apply in the Amount Applied column must equal the amount that appears in the Debit Amount field.

  7. If you want to apply part of the supplier debit to any unpaid finance charges you have accrued, type an amount in the Finance Charge field.
  8. Click Record to apply the supplier debit.
  9. If the transaction is unbalanced, that is, if the total amount entered in the Amount Applied column doesn't equal the amount displayed in the Debit Amount field at the top of the window, a message appears. Click OK to close the message and then check that the amounts you have applied to the various transactions are correct.

To record a refund cheque

  1. Go to the Purchases command centre and click Purchases Register. The Purchases Register window appears.
  2. Click the Returns & Debits tab.
  3. Select Supplier from the Search By list. Enter the supplier's name in the adjacent field. A list of debits for that supplier appears.
  4. Highlight the debit that is being refunded and click Receive Refund. A refund cheque for the amount of the supplier debit appears in the Settle Returns & Debits window
  5. Click Record to record the refund cheque.

Adding finance charges paid to suppliers

Finance charges are amounts added to an outstanding balance as a penalty for late payment to one of your suppliers. If your supplier has added a finance charge to your account, you can enter the amount in the Pay Bills window

Setting up and recording finance charges

Before you can record finance charges, you need to select an account for tracking the charges. Go to the Setup menu, choose Linked Accounts and then Purchases Accounts. Select the I pay charges for late payment option and select an expense account to record the late payment charges

Although you cannot track the history of finance charges, you can perform an account inquiry (using Find Transactions) on the finance charge linked account to view the amounts paid.

Deleting finance charges

If you enter a finance charge in the Pay Bills window, two transactions are recorded:

  • the full supplier payment, including the finance charge, is recorded in the disbursements journal, and
  • the finance charge is recorded in the purchases journal.

Therefore, if you want to delete a finance charge payment, you must delete both transactions. If only one entry is deleted, the Payables Reconciliation Summary report may show an out-of-balance amount equal to the finance charge. When you delete one of the entries, you will be reminded to delete the other entry for the finance charge. Note that the warning will appear even though you may have already deleted the corresponding payment.